显示标签为“image”的博文。显示所有博文

2019年8月2日星期五

8 EASY Travel Photography Tips to Help You Master Your Camera

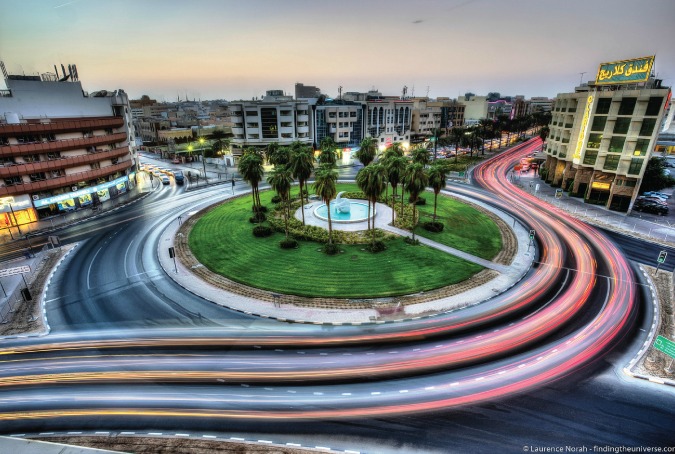
Stunning travel photo of a Dubai roundabout at nightStunning travel photo of a Dubai roundabout at night
Updated: 12/2/2018 | December 2nd, 2018

Travel photography. It’s not something I’ve very good at. I take all my pictures on an iPhone and, if they aren’t used on the blog, they mostly just sit on my hard drive. I’ve never taken the time to really improve my skills. Like learning a language, improving your photography takes time.

Luckily, just like learning a language, anyone can do it!

Travel photographs are memories. You look at a picture and it conjures up thoughts, feelings, and smells that take you back to a long forgotten place. I think it’s important we all spend a little time improving our travel photography.

Today, professional photographer Laurence Norah of Finding the Universe begins a five-part series on how to become a better photographer and take better travel photos. He’s going to share his top travel photography tips to help you improve your skills and take awesome travel photos.

Enter Laurence…

In 2009, I gave up my job in IT and set off to travel the world. My first destination was Australia, a stunning country where I desperately wanted to capture my adventures. I’d been taking photos since I was 13, but it was only on this trip that I started to focus on learning the art of photography and realized that this was something I could be truly passionate about.

I quickly learned the reality that photography is a skill that takes time, effort, and practice to master.

It’s also not a question of gear — great travel photography is very much about the photographer.

In this post, I’ll give you the 8 simple tavel photography tips you need to take better pictures right away. If you follow these rules, you won’t go wrong!

1. Composition: Taking Pictures People REALLY Want

Patterns: the human brain is a sucker for them. We’re always looking for patterns — be they shapes in the clouds, symmetry in buildings, or colors that compliment each other. There’s just something about a pattern that our brains love.

Understanding these patterns and what pleases the human brain is a nifty shortcut to taking better photos. And that’s what composition in photography is all about. Learn and apply the rules below, and you’ll start taking more photos that people will enjoy.

Before launching into them, though, some important basics. First, ensure that your camera is level. You don’t want wonky horizons. Your brain generally doesn’t like them; they’re the visual equivalent of nails on a chalkboard.

Next — stop moving. You want to be as still as possible when shooting to avoid blurry images. Hold your camera with both hands and be steady, or use a tripod.

2. The Rule of Thirds

One of the most important rules of composition is known as the rule of thirds.

I learned recently that this is based on how babies learn to identify their mothers’ faces, which can be split up into three parts, comprising the eyes, nose, and mouth.

The rule of thirds requires you to break an image into three equal parts either vertically, horizontally or both. The goal is to place key compositional elements into those thirds.

On your device, find the setting to enable a grid over the preview screen. Four lines will appear, two vertical and two horizontal.
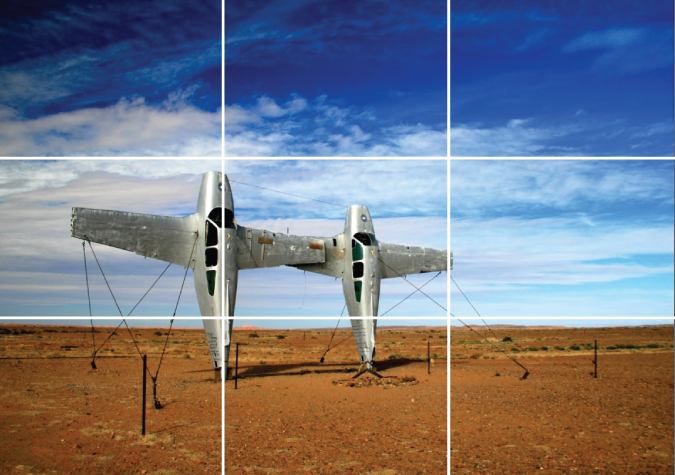
Photo of surreal art sculpture park in the Australian OutbackPhoto of surreal art sculpture park in the Australian Outback

Take a look at my shot above of a surreal sculpture park deep in the Australian outback, over which I have overlaid a grid to demonstrate the horizontal and vertical thirds.

With the grid, you can see how I have composed the image: one-third land and two-thirds sky, while the plane on the left is on the left-hand grid line, close to the intersection of two lines.

Placing subjects on the intersecting points will naturally draw the viewer’s eye to them, as these points are usually where we focus first in an image, and doing so is a great starting point for a good composition.

Another of my favorite subjects to shoot is a sunset. I love how they are always different and how wonderful the light is at that time of day.

To get a great sunset shot, you can easily apply the rule of thirds — composing the shot with two-thirds sky, and one-third land or sea. You want to avoid splitting the image half and half, as it won’t look as good. The shot below of a sunset in Santa Cruz illustrates this and also has an interesting subject in the left third of the image.
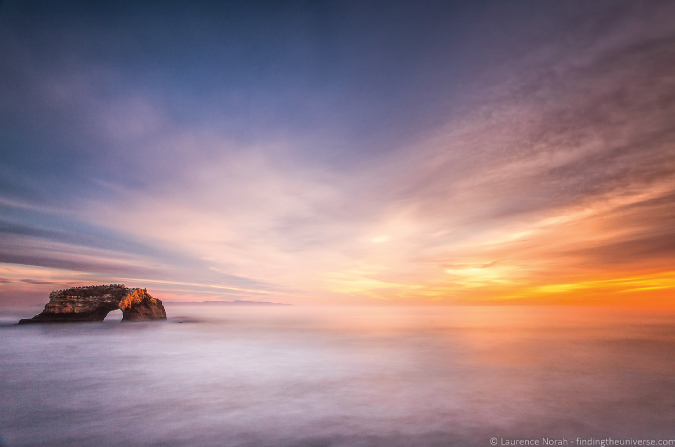
Photo of a beautiful, golden sunset over the ocean in Santa Cruz, CaliforniaPhoto of a beautiful, golden sunset over the ocean in Santa Cruz, California

3. Leading Lines

When composing a photograph, you want to make it as easy as possible for the person looking at it to figure out the subject and focus of the image.

One way to do this is with leading lines — the use of natural geography or other features that the viewer will naturally look at first and which will lead their eyes to the main subject.

Roads are excellent as leading lines, particularly in big landscape shots. When I was traveling in New Zealand, I wanted to create a photographic story of the hike up Mount Taranaki, one of my favorite New Zealand hikes. Near the start of hike, the walking trail itself gave me a perfect leading line to illustrate the journey ahead, drawing the viewer’s eye into the frame and up to the mountain.
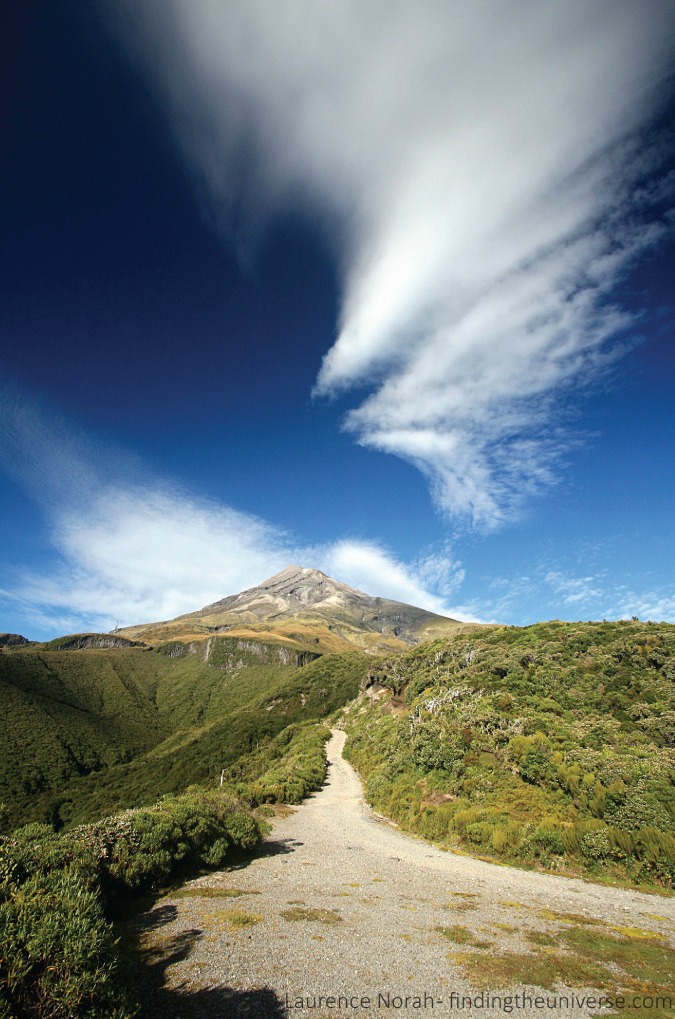
Photo of the walking trail up Mount Taranaki in New ZealandPhoto of the walking trail up Mount Taranaki in New Zealand

Another good illustration of a leading line is this shot of me walking on railway tracks in Italy. Obviously, it’s only advisable on either disused or somewhat infrequently used tracks!
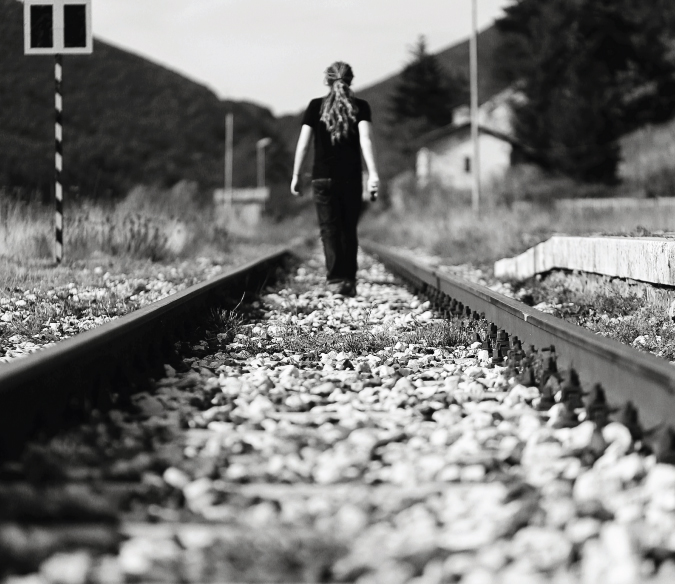
Black and white self-portrait of Laurence walking on railway tracksBlack and white self-portrait of Laurence walking on railway tracks

The goal for this image was a self-portrait that evoked my life of travel. The parallel tracks, which appear to converge, were perfect for leading the viewer’s eye to the subject — me. I felt I captured the imagery of wanderlust that I was looking for by using them.

4. Foreground, Midground, and Background

Have you ever taken a picture of a mountain or city skyline and then looked at it later and wondered why it doesn’t manage to convey the majesty of what you were looking at?

This is likely because your photograph is a two-dimensional image and you have lost the sense of scale that is apparent when you are present and in the moment.

When composing a shot — and this is particularly true for landscape photography — think about the different elements in the foreground, midground, and background of the shot.

Here’s an example of a sunset in Glencoe, Scotland, easily the most stunning place I’ve photographed in 2015.
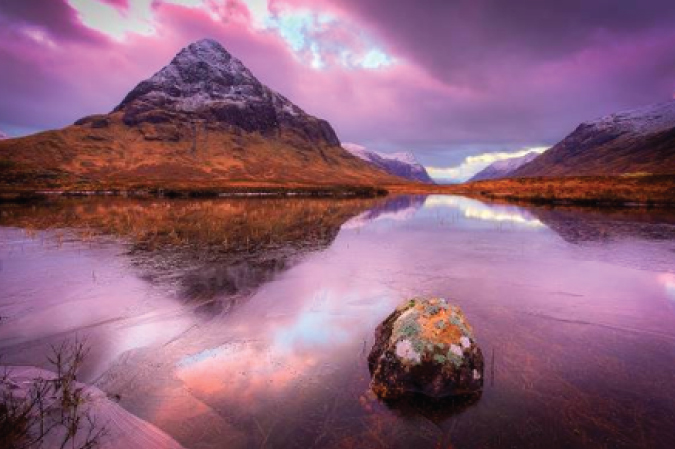
Breath-taking sunset photo over a frozen lake in Glencoe, ScotlandBreath-taking sunset photo over a frozen lake in Glencoe, Scotland

I used the rock in this frozen lake to provide something interesting in the foreground, helping to provide scale and balance to the overall image. The viewer’s eye is drawn to the rock, and then likely to the mountain and sunset, before heading into the distance of the valley.

When you are out and about in the world, think about everything around you. If you see a far-off mountain you want to shoot, look around and see if you can find something interesting in the foreground or midground to incorporate into the shot. If you’re near a river, maybe that could be a canoe. Elsewhere it could be a house. Or a group of sheep. Or a car starting to scale a winding road.

If you’re shooting a city scene, look at what is happening all around you. Street vendors, different modes of transport, and signs and storefronts can all be incorporated as foreground to provide context and scale for your city skyline or that interestingly shaped building.

If you can’t find something, be creative. Find someone to stand in your shot to provide that scale. If you’re travelling with a tripod, do what I did in that railway shot and use yourself as the subject. Just remember not to confuse your viewer too much with too many compositional elements, and keep it clear what the photo is of.

Thinking beyond the big background parts of the image and focusing on the smaller elements will help you create more balanced, pleasing images.
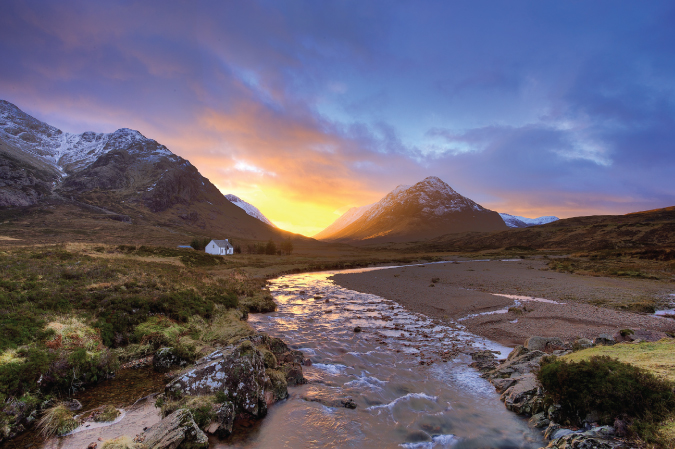
Photo of the sunsetting behind mountains in Glencoe, Scotland with a house in the midgroundPhoto of the sunsetting behind mountains in Glencoe, Scotland with a house in the midground

Another shot from Glencoe. Here the house provides that midground scale, while the river works both as an interesting foreground subject and as a leading line to draw you into the photograph.

5. Framing

This compositional technique isn’t about hanging a picture in a frame; it’s about using what’s around you to “frame” the subject you are trying to capture, illustrating to the viewer what the shot is of and drawing their eyes into the scene.
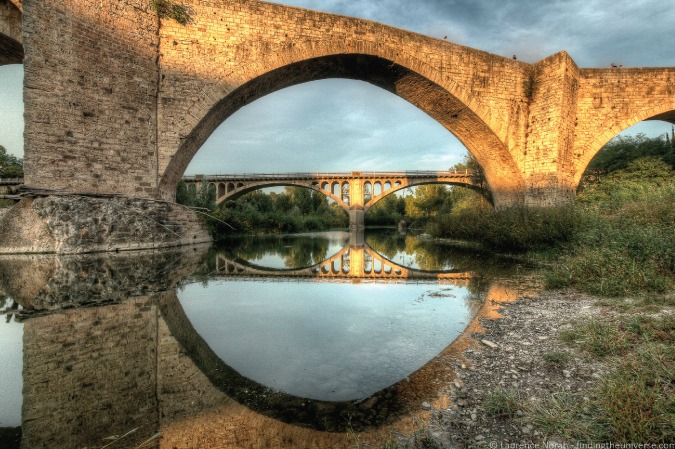
Photo of old bridges in the Medieval town of Besalú, SpainPhoto of old bridges in the Medieval town of Besalú, Spain

In this shot of the bridge into the medieval town of Besalú in Spain, I used the old bridge and its reflection as a natural frame for the newer bridge.

When you have found your subject, look around to see if there’s a way you can frame it creatively. Some good options for framing include vegetation, like tree branches and trees, as well as doors and windows.

Take a look at this shot of a temple in Ayutthaya, Thailand, to see what I mean. I wanted to capture the beauty of this temple scene while drawing the viewer into the wat in the center.
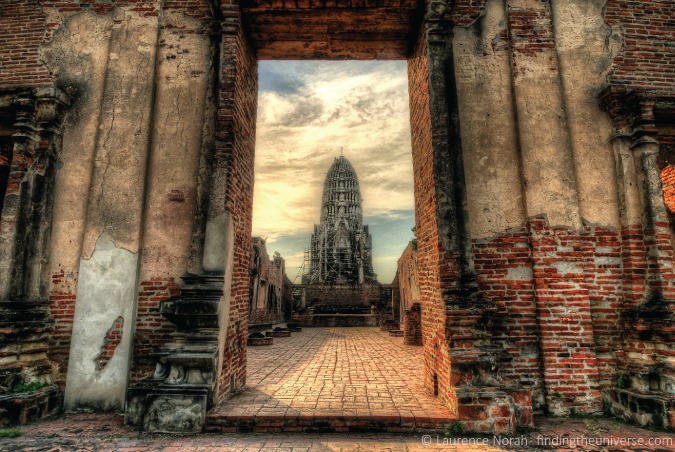
Photo of beautiful, old temple in Ayutthaya, ThailandPhoto of beautiful, old temple in Ayutthaya, Thailand

The frame in this case is much larger than the subject, but it is never unclear what the shot is of. This is a really easy photography technique, but it might require you to scout around, or step back from your subject, to find a good way to frame it. Don’t be afraid to stand further away and use the zoom on your lens to get the frame you want.

As another example, using trees to frame a waterfall, here’s a shot of Lower Yosemite Falls in Yosemite National Park.
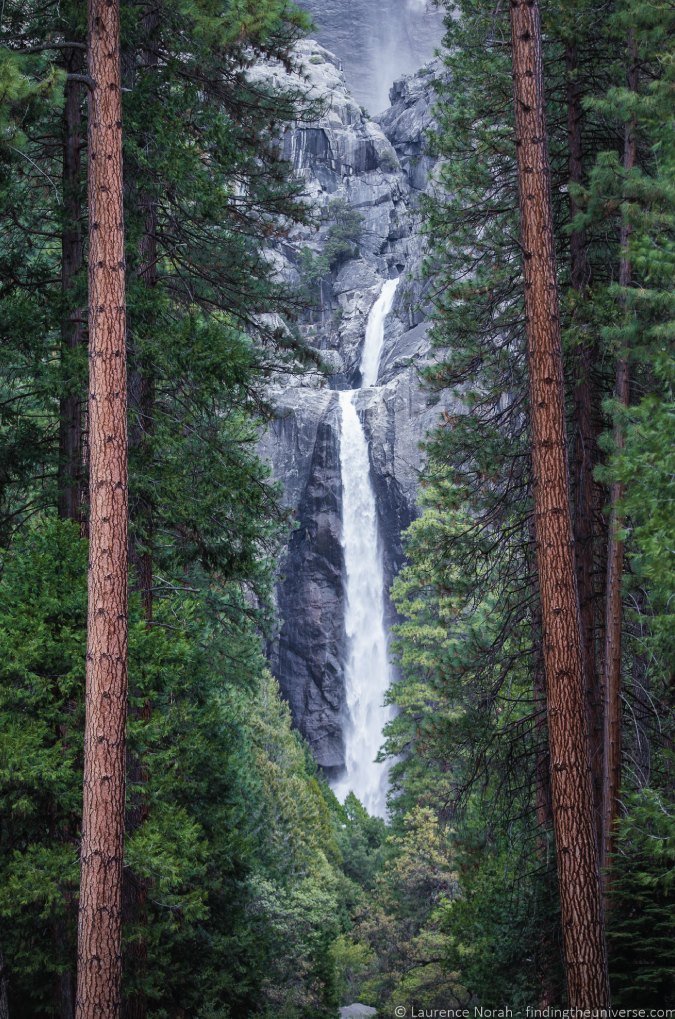
Photo of Lower Yosemite Falls between the trees in Yosemite National ParkPhoto of Lower Yosemite Falls between the trees in Yosemite National Park

I felt that the trees added much more to the shot with the waterfall between them. There was a pleasing symmetry to the shot with the two parallel trees.

There are many more options for framing. Experiment and see what works!

6. Focal Points

One way to be sure that people look at the part of the image you want them to look at is to have only that part of the image sharp and in focus and the rest blurry.

This is particularly effective for isolating people or animals in shots — take a look at wedding or sports photos of people, and you’ll see how often the subject of the shot is the only thing in focus.

I love shooting events with friends and family, and I find that this technique works really well at isolating the subject from a crowd and making it obvious who the photo is of.

Photo of a woman having at a party with friendsPhoto of a woman having at a party with friends

To start with, you can achieve this effect with the “portrait” or “people” mode on your camera. You can see some more examples of subject isolation through focus here.

7. Use of Color

Color is really important in photography, particularly how different colors work well together. For example, blue works well with yellow (sunflowers in a field), and red works well with green (Christmas!).

To figure out which colors work well together, take a look at this color wheel.

Generally, colors opposite each other on the wheel will complement each other. These colors don’t need to be evenly balanced in a shot — often images work best with a small percentage of one and a greater percentage of another.
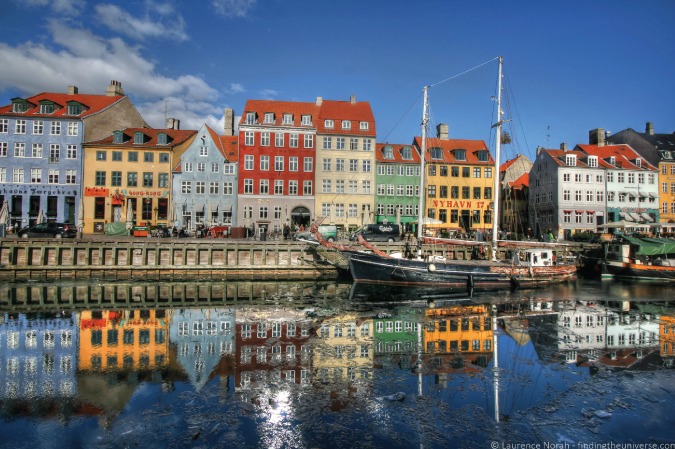
Photo of houses reflecting on the Nyhavn Harbor in Copenhagen, DenmarkPhoto of houses reflecting on the Nyhavn Harbor in Copenhagen, Denmark

Take a look at the shot above, from Copenhagen’s gorgeous Nyhavn Harbor. You can see all sorts of colors, but in particular, the blue of the sky and water is the predominant color, with the houses’ reds and yellows (yellow is opposite blue on the color wheel) offering a counterpoint.

When you are on your travels, keep an eye out for contrasting and complimentary colors that you can incorporate into your shots. Spice markets, old European cities, rural meadows, and old colorful barns in green fields are a great place to start.

8. Storytelling

Remember that when you are taking a picture, you have all the background and surrounding knowledge of your trip in your mind. When you look at the image later, all of that will come back to you.

No one else has that advantage. To them, that shot of a waterfall is just that — a shot of a waterfall. The story of the five-hour hike there through a leech-infested jungle? Lost. The feeling of how refreshing it was on your skin when you took the plunge in to cool off? Also gone. It’s just a two-dimensional image on a screen, likely quickly flicked by to be replaced by the next image in the stream.

It’s your job to bring all that lost context to life.

We’re often told that a photograph is worth a thousand words. As a photographer, it’s your job to convey those words. Figure out how to tell that story with your image. Get the shots that pull your viewers into your stories. Use emotion, find and freeze moments, and incorporate the human element so your shots resonate with your viewers.

Take this monkey in Rio de Janeiro. These guys were being really cheeky with tourists, trying to get food from them and generally playing around as much as possible. I wanted to try and capture some of that, and I managed to get this monkey sticking its tongue out at me.
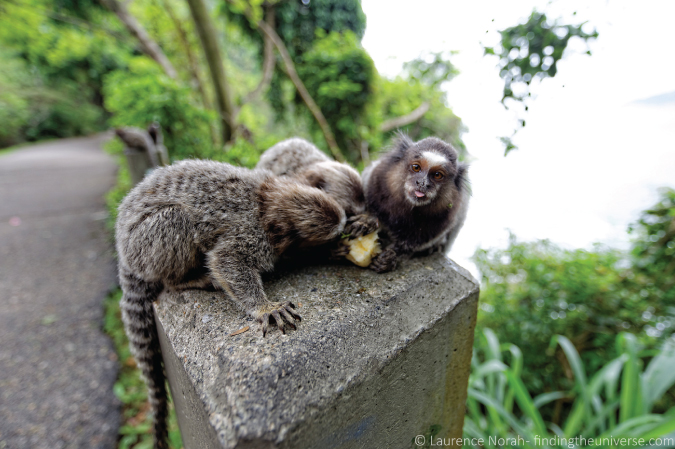
Photo of cheeky Monkey in Rio de Janeiro, BrazilPhoto of cheeky Monkey in Rio de Janeiro, Brazil

I’d advise spending time thinking about the shot you are trying to create, the moment you are trying to capture, and the story you are trying to tell your viewer. Put yourself into their shoes, imagine you are going to be looking at the shot with no other context, and try to build the shot from there.

This is probably one of the harder parts of photography, and — like the shot of the monkeys above — will likely require some time, patience, and luck. You will make errors. But with research and practice, you will be able to master it!

***

Practice makes perfect – and travel photography is no different in this regard! The more photos you take, the more you will learn how to compose and capture great shots. While reading some travel photography tips will definitely help, the key is to actually go out in the world and practice them. The more you practice, the faster this will all become second nature. It won’t happen overnight, but over time your skills will improve — I promise!

So what are you waiting for? Get out there and start taking some photos!

Laurence started his journey in June 2009 after quitting the corporate life and looking for a change of scenery. His blog, Finding the Universe, catalogs his experiences and is a wonderful resource for photography advice! You can also find him on Facebook, Instagram, and Twitter.

Travel Photography: Continue The Series

For more helpful travel photography tips, be sure to check out the rest of Laurence’s travel photography series:

Book Your Trip: Logistical Tips and Tricks

Book Your Flight
Find a cheap flight by using Skyscanner or Momondo. They are my two favorite search engines because they search websites and airlines around the globe so you always know no stone is left unturned.

Book Your Accommodation
You can book your hostel with Hostelworld. If you want to stay elsewhere, use Booking.com as they consistently return the cheapest rates for guesthouses and cheap hotels. I use them all the time.

Don’t Forget Travel Insurance
Travel insurance will protect you against illness, injury, theft, and cancellations. It’s comprehensive protection in case anything goes wrong. I never go on a trip without it as I’ve had to use it many times in the past. I’ve been using World Nomads for ten years. My favorite companies that offer the best service and value are:

  • World Nomads (for everyone below 70)
  • Insure My Trip (for those over 70)

Looking for the best companies to save money with?
Check out my resource page for the best companies to use when you travel! I list all the ones I use to save money when I travel – and I think will help you too!

7 Post-Processing & Editing Tips to Improve Your Travel Photographs

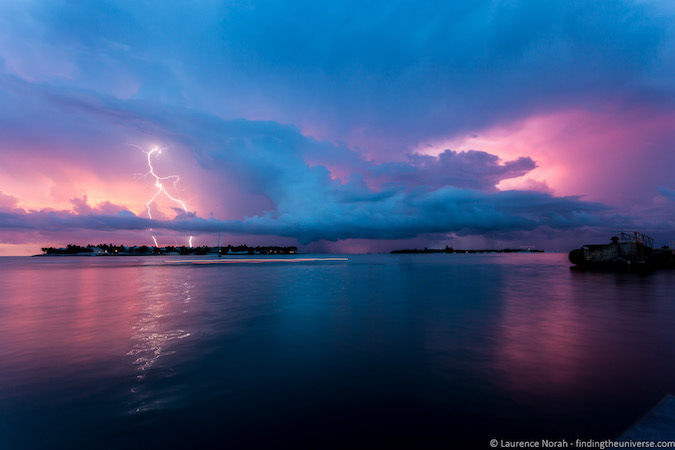
Blue pink photo of lightning at duskBlue pink photo of lightning at dusk
Updated: 12/09/2018 | December 9th, 2018

Today, professional photographer Laurence Norah of Finding the Universe, finishes his five-part series on taking better travel photos. In part five, Laurence is giving some simple post-processing techniques that you can use to make your travel photos wow your friends and family! Editing your photos is just as important as how you compose them, so I hope you’re ready to take some notes!

One of the most misunderstood parts of digital photography is what happens after you take the shot: editing your photos, aka post-processing. This is where you edit the images you have taken, to create the final product.

Post-processing is the equivalent of the darkroom from the days we shot in film.

In today’s post, we’re going to be covering some ideas for editing your photos, from the basics (cropping and leveling), through to more complicated actions like recovering shadow and highlight information.

Editing Photos: 7 Editing Tips for Your Travel Photos

1. How to Crop Your photos
The crop tool allows you to change the size of your image, and also to change the aspect ratio. For example, you can crop an image from a rectangular shape to a square shape. There are many reasons you would want to crop, including for publishing in different formats and aspect ratios.

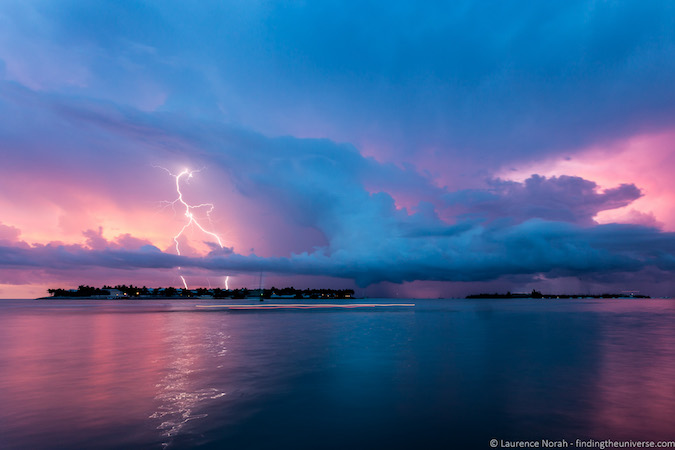
Let’s take a look at the first photo from this post, a lightning shot I took on a recent trip to the Florida Keys. Here’s the original version without cropping:

Blue dark pink nature photo of lightning at duskBlue dark pink nature photo of lightning at dusk

And the edited version, post-crop:

Blue pink photo of lightning croppedBlue pink photo of lightning cropped

Compared to the original, I have cropped the image to remove the dark part of the pier on the right-hand side of the image and recomposed using the rule of thirds, so I have one-third land and two-thirds sky. This makes the lightning bolt more the focus of the shot.

You might wonder why I didn’t just compose properly when taking the shot. Well, in this case, I was doing a long-exposure shot without a tripod, so had the camera balanced on the edge of the pier for stability. That very much limited my ability to perfectly frame the moment, so I just shot wider, knowing I’d be able to crop the shot appropriately after the fact.

Let’s look at what cropping looks inside a couple of the tools available.

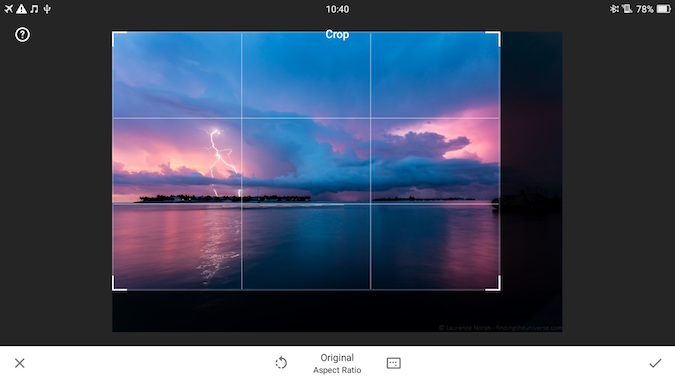
Here’s an example of cropping in Snapseed:

Blue pink nature photograph of lightning cropping mask SnapseedBlue pink nature photograph of lightning cropping mask Snapseed

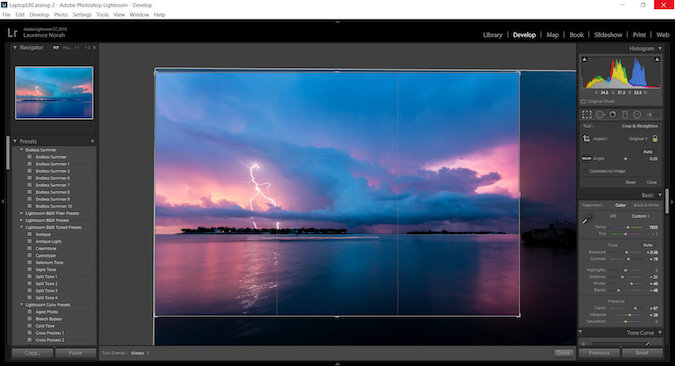
And the same thing in Lightroom:

Blue dark pink photo of lightning lightroom cropping mask LightroomBlue dark pink photo of lightning lightroom cropping mask Lightroom

In both cases, cropping is very simple: it just involves you selecting the crop tool and then selecting the area you want to keep with your mouse or finger. Then you apply the changes, and voilà, your new cropped image is ready to go.

As you see from this and later examples, the tools look similar across different platforms, so it’s easy to apply the learning you have from one tool to another.

2. How to Level Your Travel Photos
One of my personal petty annoyances in photography is when the horizon line in a photo isn’t level. Sometimes when we’re caught up in the moment, this basic compositional rule is forgotten — but the good news is that editing your photos to make them level is also very easy.

I’ll use the lightning shot as my example again. Balancing the camera on the edge of the pier meant that the shot wasn’t level — this is particularly noticeable to the eye when the image has a clearly defined horizon line, such as the sea.

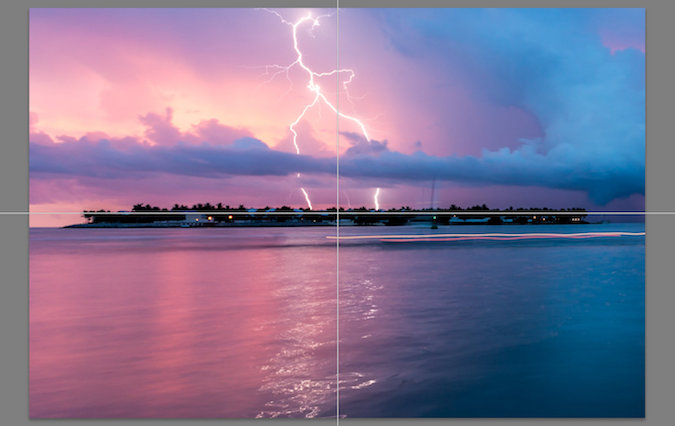
If we look at a zoomed in version of the image in its original form, with a line overlaid near the horizon, we can see that it’s not level — the line is closer to the horizon on the right-hand side than the left.

Blue pink nature picture of lightning at dusk leveling maskBlue pink nature picture of lightning at dusk leveling mask

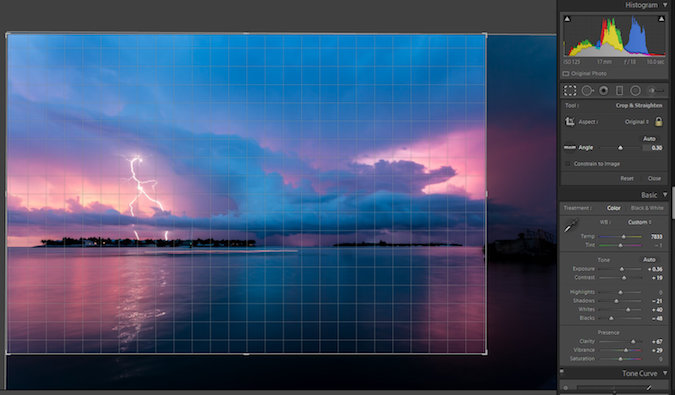
In Lightroom, the level tool is part of the crop tool, and you can just rotate the image to suit. When you use the level tool, a grid will appear to help you get the alignment correct. Here’s a screenshot of that in action in Lightroom.

Blue pink nature photo of lightning straightening mask LightroomBlue pink nature photo of lightning straightening mask Lightroom

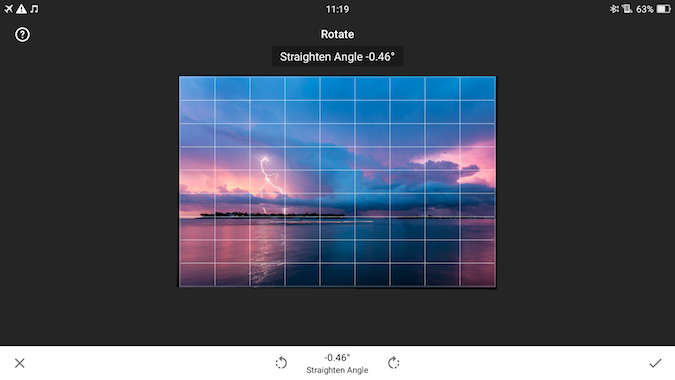
And here’s the same procedure in Snapseed, where the level tool is called “Rotate”:

Blue pink nature photo of lightning rotate feature snapseedBlue pink nature photo of lightning rotate feature snapseed

Leveling an image is a really simple task that will take just a few seconds of your time, resulting in a much more visually pleasing image.

3. Vignetting Your Photos
Vignetting is about making parts of the image darker or lighter than other parts, in order to make it clearer what the subject of the shot is.

Some tools restrict your vignette to the corners, but in applications like Snapseed and Lightroom you can selectively darken and lighten areas of the image — you don’t need to restrict yourself to the corners.

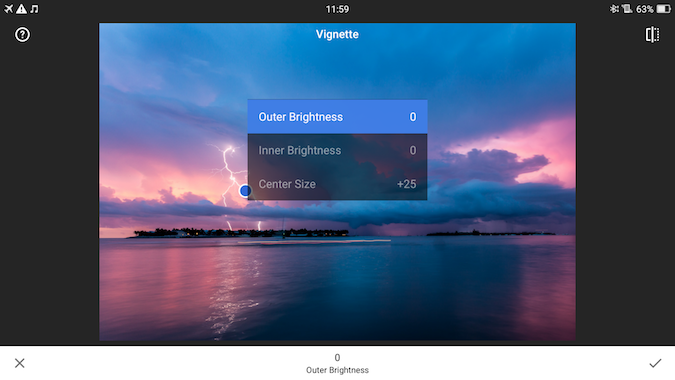
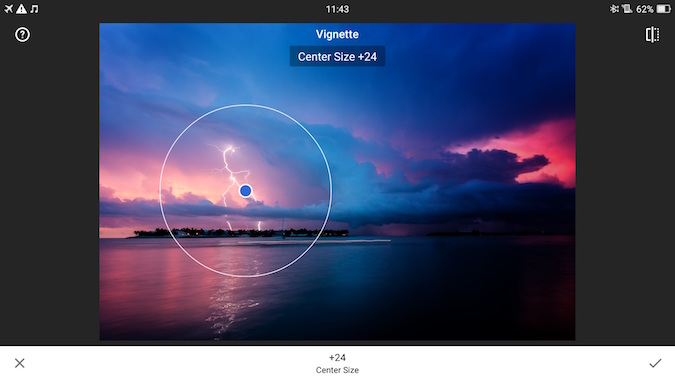
Taking the lightning shot above, let’s load up the vignette tool in Snapseed.

Blue pink nature photo of lightning outer brightness vignetteBlue pink nature photo of lightning outer brightness vignette

Here we have options for how big to make the “center size,” i.e., the area to be edited. Inside this area, everything can be made brighter (inner brightness) and everything outside the area can be made darker (outer brightness). We can also do it in reverse, making the inner darker and the outer brighter.

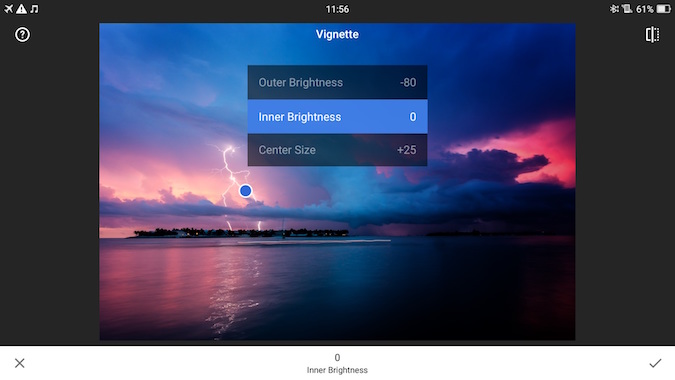
Let’s apply the vignette tool to the lightning bolt, to give you an idea of the effect:

Blue pink nature photo of lightning inner brightness vignetteBlue pink nature photo of lightning inner brightness vignette

Above are the settings I chose for outer brightness and inner brightness, while below is the size of the vignette itself, which is based on the center size setting.

Blue pink nature photo of lightning vignette center pointBlue pink nature photo of lightning vignette center point

Vignetting is particularly good for portraits, and anywhere where you really want to make the subject of the image more clearly obvious to the viewer.

4. How to Change Shadows and Highlights in Your Photos
Sometimes when we take a photograph, parts of the shot might end up being darker or brighter than we want. We refer to the dark areas of the shot as shadows, and the bright areas of the shot as highlights.

We can fix this by changing the brightness of the shadow and highlight areas specifically, using either the “Shadow” or “Highlight” tool. This is a tool that works particularly well on RAW files as they retain more information on the shadow and highlight areas of an image compared to a compressed JPG, which discards most of this information in order to save file size.

Let’s take a quick look at adjusting shadows and highlights using Lightroom. In Snapseed, shadow and highlight adjustment can be found under the “Tune Image” setting.

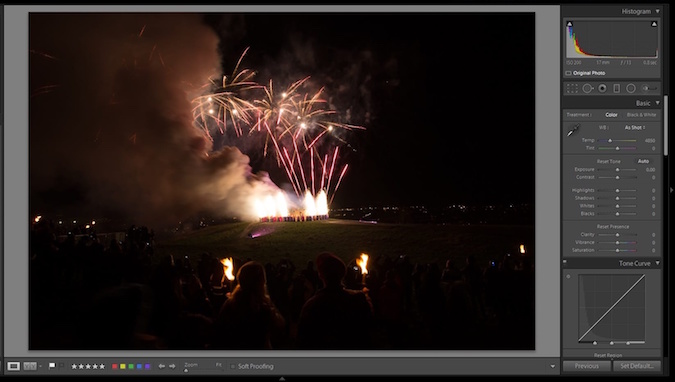
Here’s a shot of a couple enjoying a bonfire and fireworks display in Edinburgh during Hogmanay:

Contrast tutorial with fireworks at hogmanay in Lightroom - beforeContrast tutorial with fireworks at hogmanay in Lightroom - before

As you can see, the fireworks and bonfire are clearly visible, as are the torches the couple is holding, but the rest of the shot is dark. Let’s adjust the settings and see what we can get.

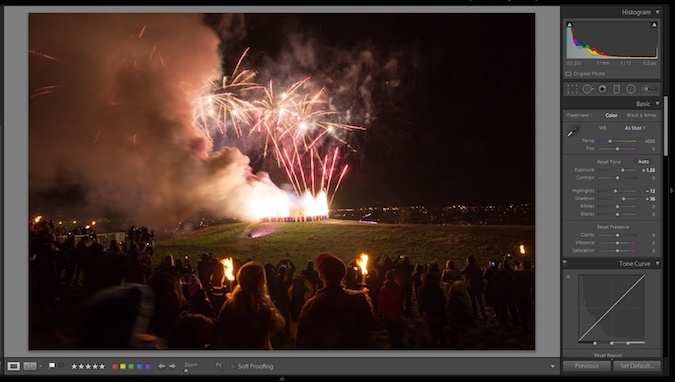
Contrast tutorial with fireworks at hogmanay in Lightroom - afterContrast tutorial with fireworks at hogmanay in Lightroom - after

In this version of the image, the couple is much more visible, as is the hill the fireworks are on and the surrounding crowd.

To achieve this I increased the overall exposure of the image, making the whole image brighter, including the shadows and the highlights.

Then, as the shadow areas were still a little dark, I increased those a little more.

Finally, as the global exposure adjustment made the fireworks and bonfire too bright, I reduced the highlights a little bit to give the final result.

Shadow and highlight adjustment is useful in a wide range of scenarios to help balance the image out — bringing overexposed areas down in brightness, and helping to boost the shadows. Just be aware that a light touch is recommended — increasing the brightness of the shadows too much can result in a lot of noise being revealed, which might look unnaturally green or purple.

5. How to Adjust the Contrast
Contrast is about accentuating the difference between the light and dark parts of the image. Increasing the contrast of an image can dramatically improve the visual impact that has, by making the boundaries between those light and dark parts clearer.

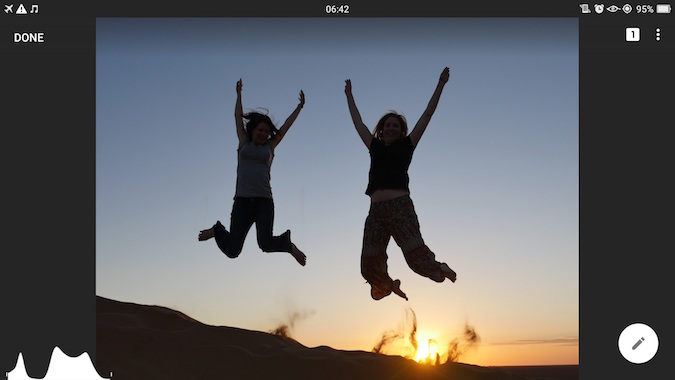
Let’s take a look at a shot of people jumping against the sunset in the Sahara, for example, which I’ll be editing in Snapseed.

Girls jumping on sand dunes - original photoGirls jumping on sand dunes - original photo

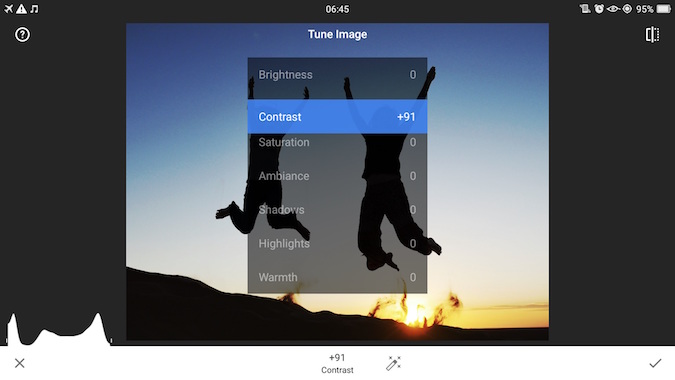
There is nothing too wrong with this shot, but it lacks the visual impact that I wanted. Ideally, I would want the shapes of the people to be in full silhouette against the sun, but as it was shot the camera picked up some skin tones and clothing color.

Using the contrast tool, we can make the dark areas stand out against the bright areas.

Girls jumping on sand dunes - contract tutorial photoGirls jumping on sand dunes - contract tutorial photo

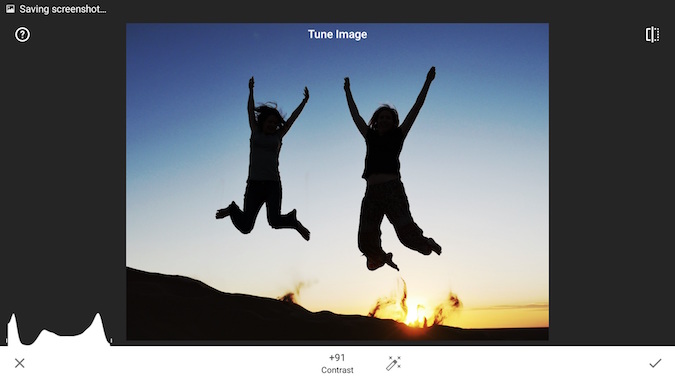
And here’s the result:

Girls jumping on sand dunes - after photoGirls jumping on sand dunes - after photo

As you can see, this made the jumping figures and the dune more silhouetted against the sky. In most shots, you only want to tweak the contrast a little bit to get the desired effect, normally no more than +20 or so, but in this case, the higher number gave the best result.

6. How to Adjust Colors
Color adjustment is another important piece of the editing toolkit. We can adjust image color in all sorts of ways, from changing the overall “warmth” of the image (how blue or yellow it appears), to individually changing the hue and saturation of specific colors inside of an image.

For this post, though, I just want to cover some very simple color changes you can use to make your images just a little more visually impactful.

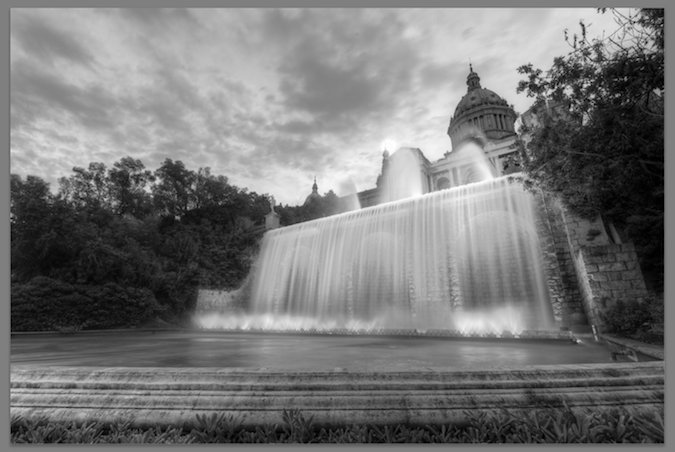
The fastest way to adjust an image’s color is with the “Saturation” tool. This changes the appearance of every color in an image to make it more or less saturated. We can use the saturation tool to desaturate an image, eventually resulting in a black-and-white image with no color:

Photo of orange building and waterfall - black and white - desaturatedPhoto of orange building and waterfall - black and white - desaturated

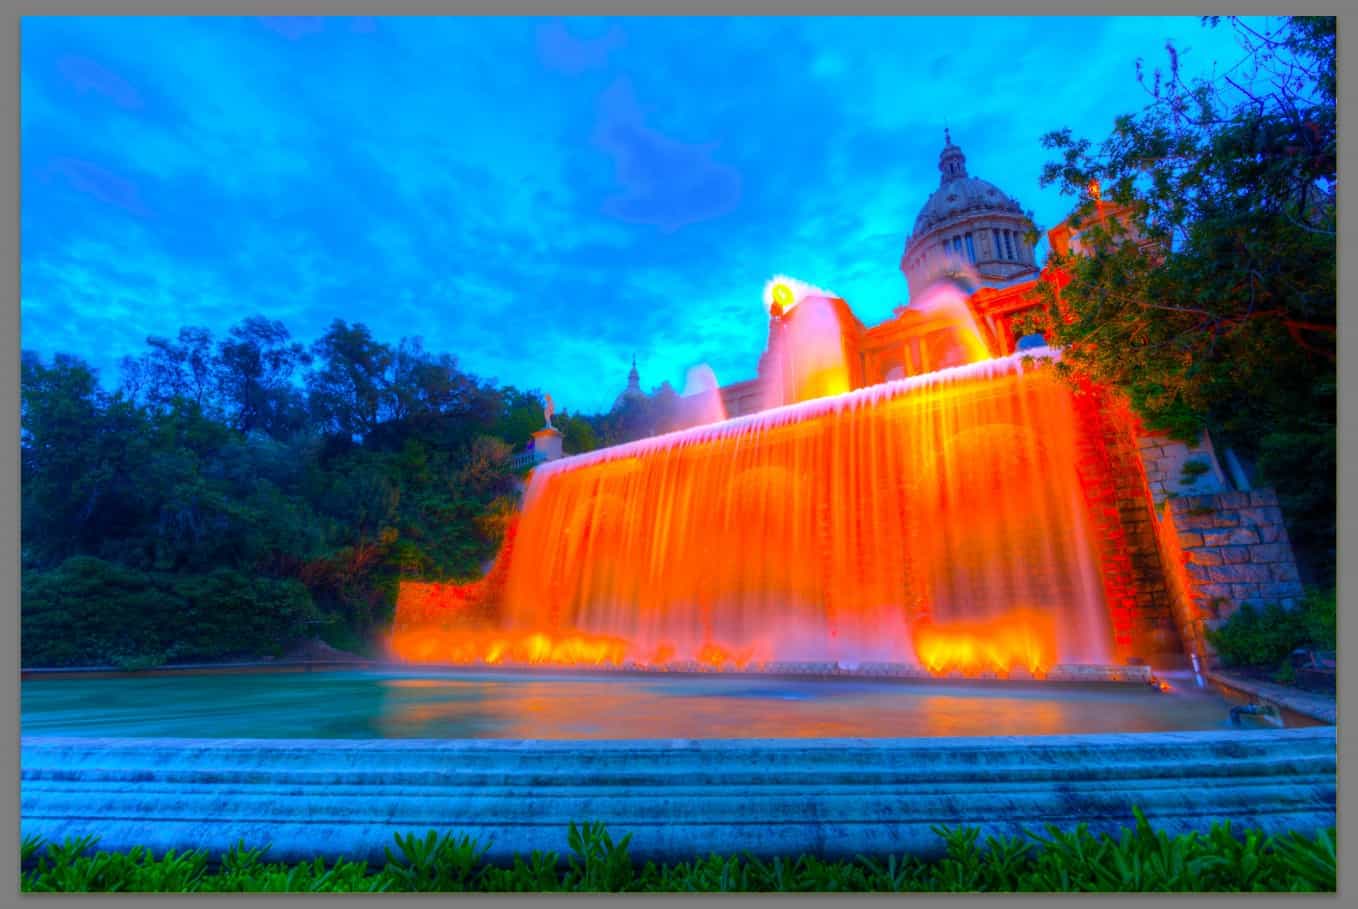
Or we can go all the way to the other end of the spectrum, and make the color incredibly saturated:

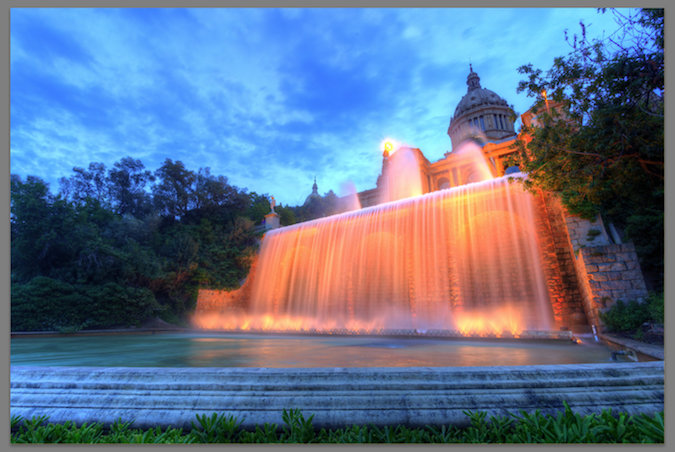
Photo of orange building and waterfall - neon - saturatedPhoto of orange building and waterfall - neon - saturated

As with many edits, the key is to find a good balance — oversaturated images tend to look rather unnatural. Desaturated images can be very effective, and of course black-and-white is an excellent choice for all sorts of situations, in particular, portraits, architecture, and certain landscape scenes. But generally you would want to find a happy midpoint: not too oversaturated and not too undersaturated.

Photo of orante building and waterfall - normalPhoto of orante building and waterfall - normal

Saturation is adjusted on a sliding scale and is on the basic adjustments panel in Lightroom or the “Tune Image” option in Snapseed.

7. Blemish correction
The last area I’m going to touch on today is blemish correction, or “image healing.” Sometimes there will be something in an image that you really don’t want to be there, like an inconvenient pimple on someone’s face. This is easy to remove in all the major editing tools.

You can, in theory, remove any object from a scene, but the healing tool works best on distinct, small objects that are surrounded by uniform colors. This is because the heal tool has to replace the area you wish to remove with something else, and this works best when it has an area nearby that looks similar. So for example, a pimple on a face is surrounded by a lot of similarly colored skin, so the heal tool can easily calculate what to replace the pimple based on the surrounding area.

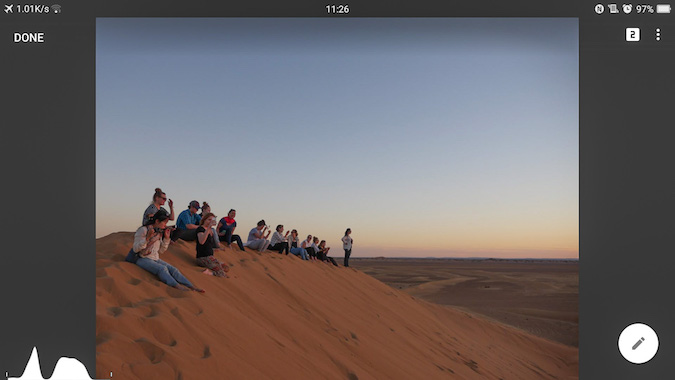
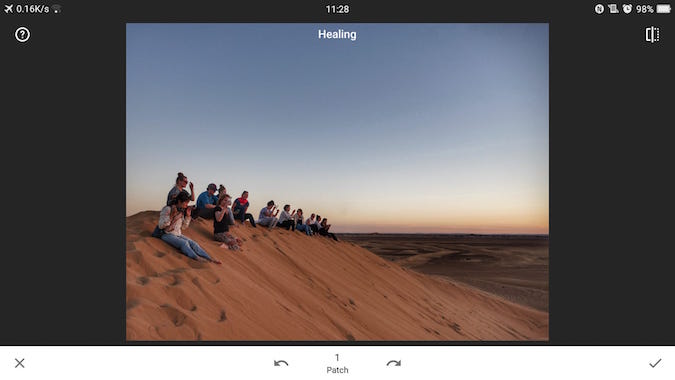
For this example, I’m going to show how Snapseed can be used to replace an object in a scene. Here’s a group of people sitting on a sand dune in the Sahara:

People sitting on a sand dune in Lightroom 1People sitting on a sand dune in Lightroom 1

Let’s say for some reason I only wanted to have people sitting in my shot, and I need to remove the standing person. She is a good candidate for removal as she is separate from the rest, and the surrounding scenery is not too complicated.

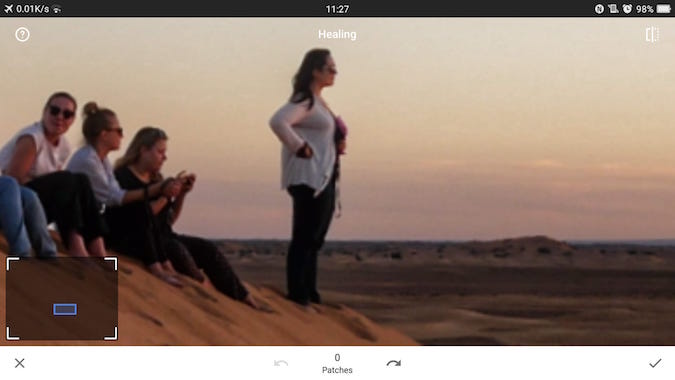
In Snapseed, we load up the healing tool, then we zoom in on the object to be removed with the standard “pinch to zoom” gesture.

People sitting on a sand dune in Lightroom 2People sitting on a sand dune in Lightroom 2

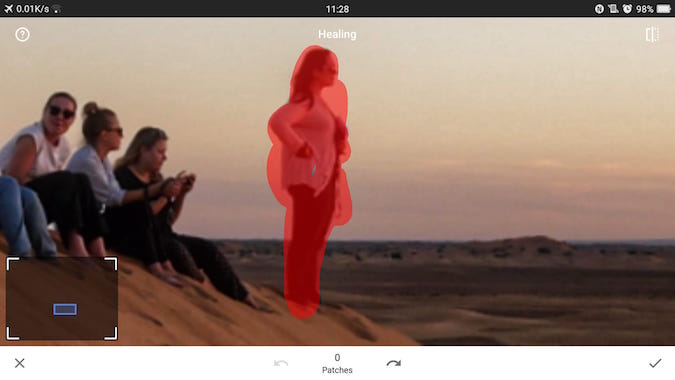
Next, we use our finger to draw the area to be removed. It’s important to be as precise as possible because the tool is most accurate with small objects.

People sitting on a sand dune in Lightroom 3People sitting on a sand dune in Lightroom 3

Once we have drawn the area, Snapseed will edit it out, replacing it with the best guess of what is behind the object.

People sitting on a sand dune in Lightroom 4People sitting on a sand dune in Lightroom 4

As you can see, the result is impressive, with no real evidence that there was anyone standing there at all.

The healing tool is perfect for all manner of fixes, from editing out unwanted background strangers in your shot, to removing skin blemishes in portraits or power lines in landscape shots.

Best Photography Editing Software

Here is a list of the best editing tools out there:

  • Adobe Lightroom (PC or Mac) – Lightroom is the industry standard tool for photography professionals. But this post is not going to focus on Lightroom, nor cover everything you can do in Lightroom, as it’s a massively complex tool, covering both photo management and photo editing.
  • iPhoto (Mac) – I list iPhoto here mainly because it’s a commonly used tool among Apple users. However, I personally never recommend using it. While it will let you do everything that I cover in this post and is better than nothing, the way it manages your photos makes it hard to migrate to a more sophisticated system further down the line if you choose to do so.
  • Picasa (PC or Mac) – Picasa is a free desktop photo editing application from Google. It’s very simple, but it allows you to do everything I’m going to cover in today’s post. If Lightroom is a bit overwhelming, Picasa is a great, free place to start.
  • Snapseed (iOS or Android) – Another free Google tool, Snapseed is the best mobile image-editing app for both iOS and Android. It’s an incredibly powerful tool that, while simple to start using, has a great many features that take time to fully master. I use it for 95% of my mobile editing needs.

Let’s take a look now at what you can and should be using these tools for with your images.

***

Editing your photos is a crucial step that far too many people skip. As you can see from this lesson, there is much more to editing your photos than just picking a filter and posting your picture on Instagram. By incorporating some of these tips and techniques into your post-processing routine you’ll be able to improve your travel photography in leaps and bounds.

So get out there and start taking pictures!

Laurence started his journey in June 2009 after quitting the corporate life and looking for a change of scenery. His blog, Finding the Universe, catalogs his experiences and is a wonderful resource for photography advice! You can also find him on Facebook, Instagram, and Twitter.

Travel Photography: Learn More Tips

For more helpful travel photography tips, be sure to check out the rest of Laurence’s travel photography series:

Book Your Trip: Logistical Tips and Tricks

Book Your Flight
Find a cheap flight by using Skyscanner or Momondo. They are my two favorite search engines because they search websites and airlines around the globe so you always know no stone is left unturned.

Book Your Accommodation
You can book your hostel with Hostelworld. If you want to stay elsewhere, use Booking.com as they consistently return the cheapest rates for guesthouses and cheap hotels. I use them all the time.

Don’t Forget Travel Insurance
Travel insurance will protect you against illness, injury, theft, and cancellations. It’s comprehensive protection in case anything goes wrong. I never go on a trip without it as I’ve had to use it many times in the past. I’ve been using World Nomads for ten years. My favorite companies that offer the best service and value are:

  • World Nomads (for everyone below 70)
  • Insure My Trip (for those over 70)

Looking for the best companies to save money with?
Check out my resource page for the best companies to use when you travel! I list all the ones I use to save money when I travel – and I think will help you too!